
CHALLENGE BLOG
ATC Exchanges
Hi All! Hope everyone is doing great! I participated in an ATC exchange this month over at So Suzy Stamps and my packet came in the mail today. I LOVE participating in ATC exchanges and I am here to tell you why.
Riley and Company - National Coffee Day
Today is National Coffee Day and day 5 of the Coffee-Lovers blog hop! I am also hosting the DT Challenge over at Riley and Company and the theme I chose was...COFFEE!
Extra Fries or Exercise?
I typically don't order extra fries because that would mean more exercise and as you can see the two DO sound familiar.

Coffee Lover's Blog Hop Day #4
It is Monday, but also day 4 of the Coffee Lovers blog hop. I have been faithfully posting every single day and after this post I don't have any more coffee cards made, so I better get to it!
for this inspiration, I have posted two coffee passport cards. They are similar except for one being a Starbucks theme and one being a more generic theme. You will see what I mean as you continue to read.

Coffee Lovers Blog Hop - Day 3
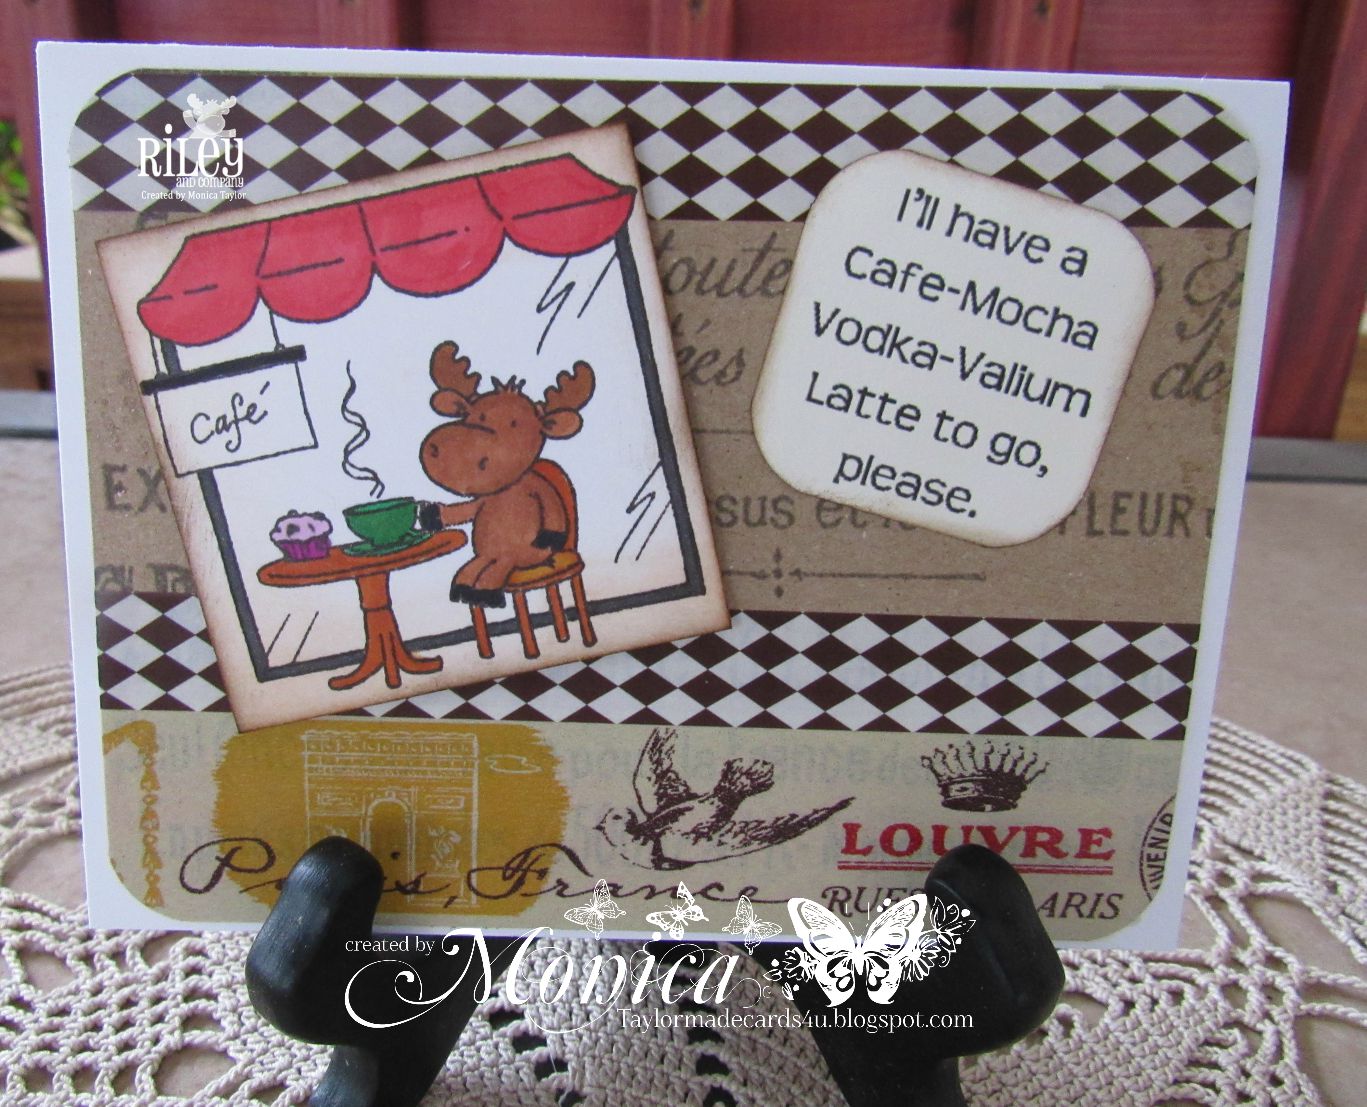
It may not be the first day of Fall, but it is Day 3 of the Coffee Lovers blog hop. I am sharing a card I made using one of the Funny Bones over at Riley and Company!

This is a really fun stamp that many people can appreciate. I have not had my Pumpkin Spiced Latte yet, but rest assured, it will be very soon.
Be sure to check back tomorrow for my Day 4 post and hope you are enjoying the hop!
Thanks for stopping by.

For more fun and inspiration you an follow me on Facebook, Instagram, Twitter, Pinterest and now Periscope
Coffee Lover's Blog Hop Day #2


It is day 2 of the Coffee Lover's blog hop and I am here to share my card using an image called Coffee Riley and newly released sentiment from the funny bones collection called hating everybody.
Be sure to check back tomorrow for my Day 3 post.
Thanks for stopping by.
For more fun and inspiration you an follow me on Facebook, Instagram, Twitter, Pinterest and now Periscope
 |
| Spellbinders Edgeabilites - Classic Ric Rac |
Coffee Lover's Blog Hop Day #1
Good morning and happy Friday! Today is the start of the Coffee Lover's blog hop and I am so excited. This is the third time that I have participated and my goal is to post every day. I do try to comment as much as possible, but I have not been successful in commenting on every entry yet.

I made the background of this card using a new technique I learned on You Tube. I loved how even though the background is torn up papers, they look like one pattern. I stamped the background using a coffee cup, or tea cup if you prefer, from stampin up.
The printables are from VectoriaDesigns and the ribbon I picked up from So Suzy Stamps. I used Walnut Stain Distressing ink around the edges to give it an aged look.
Be sure to check back tomorrow for my Day 2 post.
Thanks for stopping by.
For more fun and inspiration you an follow me on Facebook, Instagram, Twitter, Pinterest and now Periscope
 |
| Coffee Card |
 |
| Coffee Beans |
 |
| Coffee Journal Cards |
The most desirable Man
Hi everyone and happy Thursday! Did you know that Riley and Company had a new release this month? They have some fabulous Funny bones stamps and I am here to share a card I made using one of them.

The sentiment is called Genie and they have a cute Riley Jeanie that goes perfect with it.
I wanted to do a CAS card, but make it fun whimsical. Pattern Medley from Craft Smith has some great whimsical paper patterns and worked great for this card.
You can see more of the new release over at Riley and Company, but I will be sharing all month long.
Many of the prodcuts and items I use are listed under my Products Tab. Be sure to check it out.
Thanks for stopping by.
Don't forget to check the Cornish Heritage Farms Design Team's cards on their blogs:
 |
| Pattern Medley |
Altered Cigar Box & Matching Passport Cards - Part 2
Hi everyone. I am back to share one of the passport cards and matching tags we will be creating in Bloomfield, NM for a class So Suzy Stamps is hosting.

This passport card was created using papers from Graphic 45 called Steampunk Debutante. What I love about Graphic 45 is that you get paper that has images not only on the front, but back as well. They also have matching stickers as well as chip boards that work as great embellishments to your project.

The balloon stamp is from So Suzy Stamps and is called Vintage Balloon. It matched the paper perfectly. I stamped it using using Distress ink from Ranger called Pine needles.

There are also some wonderful embellishments that I added. I used the hinge clips that hold the Philosphy Tag and Swivel Clasp.

I even made a matching tag that fits perfectly into the pocket.
The class is still taking reservations, so if you would like to join us here is the link: Special Classes
Thanks for stopping by!
For a complete list of items I used see below or click on the Products tab on my blog.
Products
- Graphic 45 Steampunk Debutante
- So Suzy Stamps: Vintage Balloon, Paris Post Mark, London Post Mark, Bonjour, Sending an instant Hug
- Distress ink: Pine Needles, Walnut Stain
- Manilla Tag
- Ideaology: Swivel Clasp, Philosophy Tag, Word Bands, Hinge Clip
- StazOn Ink Ganache
- Scotch Tap Glider
Friendship gives wings to the heart
It is time again for the Design Team challenge over at Cornish Heritage Farms and the theme this week is Friendship,

I was playing with my alcohol inks this weekends, and when I do that, I make several samples as it is a messy process and I want to get the most out of my inks. I love butterflies, and the sentiment I am using is from the friend expressions set and worked perfect with butterflies.

Don't forget to check the Cornish Heritage Farms Design Team's cards on their blogs:
Thanks for stopping by!
Altered Cigar Box & Matching Passport Cards - Part 1

Hi everyone. I wanted to share with you some projects that I will be teaching in March over at So Suzy Stamps. These are two of my signature items, altered cigar boxes and Passport cards. I will be teaching a class on how to make both of these.
The class will be held over in Bloomfield NM at So Suzy Shop and you can find the sign up link by clicking HERE: Special Classes
Over the next couple of days I will show you each of these items in a separate post so that I can share all the details of these wonderful projects.
Today I wanted to share the Altered Cigar Box. These projects were all completed using Graphic 45 Debutante series and printables from VectoriaDesigns.

Here is the top of the box. As you can see It is decorated with several embellishments to include metal embellishments, flowers, stickers, and printables.

The inside is decorated using matching paper from Graphic 45.

The sides are embellished using lace and ribbon to add to the vintage feel.
Be sure to check back again tomorrow where I will be sharing one of the passport cards and matching tags.
For more fun and inspiration you an follow me on Facebook, Instagram, Twitter & Pinterest and now Pariscope
 |
| Steampunk Stamps |
Path Of Positivity - Determination
It is mid month and that means time for some more inspiration over at Path of Positivity.

Our theme this month has been dedication. I chose to work with this cute little image of a V.W. Bug from Sparkle N Sprinkle called VW Bug.

I have always loved Bugs. They just seem like the perfect fun car. Great for an adventure where anything is possible. You have to have dedication to your dreams for only you can make them come true!
If you have not linked up for our challenge yet, there still is time. We would love to have you play along and tell us what dedication means to you!
Tim Holtz - 12 Tags of 2015

I found some time last night to bring out the alcohol inks and play along with the September 12 Tags of 2015 that Tim Holtz hosts every month.
Now I never have won (boo hoo), but it is fun learning new techniques and also re experimenting with old ones. Alcohol inks are not new to me and I enjoy playing with them. It is a messy play for sure though, so you have to be in the right state of mind.
On his tag this month he used clear texture paste to create his embossed look. I did not have any so I just used an embossing folder and it seemed to work fine. I knew I would be covering my butterfly stamp with some fussy cut butterflies, so I was not too worried about embossing over my image.
Truth be told, it really did not look that bad anyway.
I have had some wire on hand forever, so I was glad to see another way to adhere my word bands. I love those word bands, I use them often.
So I hope that you like my tag, whenever there are butterflies involved, you know I will be playing along!
Thanks for stopping by.
For more fun and inspiration you an follow me on Facebook, Instagram, Twitter & Pinterest and now Pariscope
I would like to share my tag with the following challenges:
- Sweet Stampin - emboss it
- Crafty Friends Challenge - something beginning with B
- Brown Sugar – No. 164 - Anything But a Card
- Crafting-With-Friends - Anything Goes
A Good Man
It is amazing what you find when you clean your craft room. I found this sentiment that I purchased 2 years ago at the Mesa Scrapbook convention.
I can't believe that I never used it as it is a good one.

The image is from Sparkle N Sprinkle and it is called Wine Friends. I have used it in the past, and it is a good one.

I can't believe that I never used it as it is a good one.

The image is from Sparkle N Sprinkle and it is called Wine Friends. I have used it in the past, and it is a good one.
I would like to share my card with the following challenges:
- Doodle Pantry M,First Tuesday,1E,SIO - must use digital image - Anything Digital Goes
- Through The Craft Room Door - Always Anything Goes
- Crafting from the Heart - - Always Anything Goes
They Dared Me to - Riley and Company
This weeks Riley and Company's Design Team Challenge is hosted by Heather and her theme is "Send in the Clowns."
We are to create a project using a funny sentiment, funny picture or Circus themed.

I decided to decorate my card using a circus theme, but finished it off with a funny sentiment. The image I used is from the Circus collection called Canon Riley. I have had this fun circus designer paper for a while and it is always fun to bring it out and play with it.
The sentiment works with so many of the Riley images. It is called "They Dared Me."

Don't forget to check out some of the other Design Team projects on their blogs.
Thanks for stopping by!
Expresso Christmas Tree

I had some time this weekend to try out a new technique that I saw on You Tube! It was actually performed on a canvas, but of course as a crafter, I modified it to meet my needs.
I really liked this technique because now I have use for all my little scraps of paper. I will just put them in a baggy and they will be ready when I am ready. Let me show you what I did.
- Tear up between 10 - 15 pieces of paper (depending on size)
- Rip all 4 sides of each paper
- Distress all 4 sides using Walnut Stain Distressing ink
- Glue down each piece overlapping to cover 4.25" x 5.5" card stock
- Using your finger, spread Gel Medium (found with Gesso products)
- Cut edges with Fancy scissors and distress sides using Walnut Stain
- Using walnut stain distressing ink, stencil an ATC 3.5" x 2.5"
- Distress sides of card
- Adhere tim holtz washi tissue and Harlequin tape
- Stamp ATC with Coffee Christmas Tree using StazOn Midi - Cactus Green
- Stamp Postale image using StazOn Midi - Ganache
- adhere Christmas Vintage Christmas Tickets from VectoriaDesigns
- Tie twine around bottom of card
- Add Start to top of tree
- Adhere to Base of white cardstock
Now it seams like a lot of steps, but it really is not. Most of the time will come from tearing up the paper and distressing the sides, but if you do this along the way, and save your scraps, you will find that you can put a card like this together in no time.
The Gel Medium really brings out the distressed ink and makes the background look line a continuous pattern, so don't skimp or skip this step. It really does make the card.
Good luck!
 |
| Vintage Christmas Tickets |
Fridge Magnets - Deflecto Magnetic Sheets
I can never have enough fridge magnets! There is always something that I need to be reminded of. An event, Dr.appointment, you name it. So I thought I would make some cute little fridge magnets that are not only useful, but informative!

These cute little sayings are from So Suzy Stamps! She has the funnest snarkiest stamps that work great for my fridge magnets.
The Deflecto Craft Magnetic Sheets are thin enough to use with your die cuts, which is what I did for my project. I used StazOn Ink so that it would not smear and used distressing ink around the edges.
I had this cute little metal crown that went great with the "Throw on a Crown" stamp!

Any rubber stamp would work, not just sentiments. Imagine how pretty your "Fridge Magnets" could be!
Subscribe to:
Posts (Atom)
Featured Post
Challeng Winners - February & March 2023
Hello everyone. As you may have noticed, I have been MIA for the last couple of months. Life has been very busy and it has been difficult...

-
 Hi friends! I am so excited about the new idea-ology product that Tim is releasing this year that I decided to sit down and create! My fav...
 -
 Hey everyone! I hope you are enjoying the projects created by the STAMPlorations design team for the Spring Fling event. It is Day 2 an...
 -
 Hello everyone. As you may have noticed, I have been MIA for the last couple of months. Life has been very busy and it has been difficult...